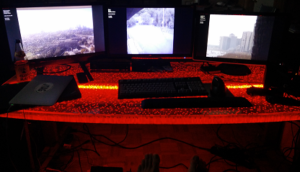
SurveillanceSaver Revived!

SurveillanceSaver randomly goes out to open web cameras all over the world and uses their video streams as your screensaver.

This has a strangely hypnotic effect, and it was really fun to watch.  This was all the rage back in 2007.

I suddenly remembered how much fun this was the other day, and went to install the original SurveillanceSaver on a Windows machine with three monitors.  I thought it would be cool to have all three monitors going with different camera feeds.  It kind of goes with the super-villain vibe I’m cultivating in the office.

Turns out, the links included in the binary are all dead and there are bugs in the installer related to changes made in Windows years ago.  No problem, the source code is on Google Code and that still exists, right?  I briefly flipped open the code, saw that the comments were in German and that there was more than one file of actual code and just closed it.

Let’s be honest, there are many times when it’s just easier to rewrite the whole thing.  German comments and a whole ton of code for no discernible reason is one of those times.  I just grabbed some classes from the post-2007 internet that handled MJPEG streams and implemented all the ScreenSaver-specific stuff for modern Windows, slapped on about 200 lines that just randomly change which stream is going to what monitor, and we’re back in action!

Most importantly, it works on any number of monitors.

The code is on GitHub:  https://github.com/awgh/SurveillanceSaver

There is a Windows installer available here.

Here’s a couple pictures of three screens running SurveillanceSaver on my glowing desk:
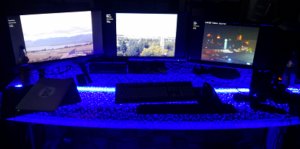
surveillancesaver-3monitors1-lowres surveillancesaver-3monitors2-lowres

Three screens each have three separate video feeds, and there’s a bit of text added to the left side that attempts to guess where in the world the feed is coming from.  Every couple of minutes, the feeds will change.

Try it yourself, it’s fun!

To install, just run the installer and follow the prompts.  Then, right-click on the Desktop, go to Personalize, go down to Screen Savers, and then select “SurveillanceSaver” from the drop-down and hit OK.

One other note – the m05.de folks never published their Google search code that generated the list of webcam links the screensaver used.  It wouldn’t do any good now, anyway, since the Google Image Search API that it used got end-of-lifed a few years back.  I had to write an updater from scratch that is just doing some simple scraping.

For future work, I would love to expose the rotation timer to the Settings dialog and to fix the updater to use a proper Search API so that it can get more than 100 results per query.  I’d also like to update the original version of the Quartz Composer/OSX version of the same screensaver.  If any of you feel inspired, send me your pull requests!
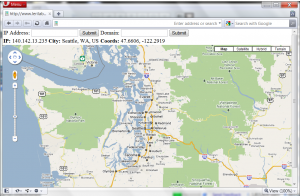
Geolocation of IP addresses using GeoIP and Google Maps

People mean totally different things when they use the word “hack”.

To me, hacking is what Dr. Frankenstein did just before he created his monster.

Today’s creation will glue a few parts together to make a web site that will show the geographical location of an IP address on Google Maps.  This script also lets the user look up the geolocation by DNS hostname.

The advantage of my approach over some others on the net is that this method is totally free and requires no API key.  I’ve also made it portable to shared hosting sites, and it will run just as easily on Linux, OSX or Windows web servers.

Screenshot of iplocate.php in action

First, an ingredients list:

  1. A web server or web hosting site that supports PHP.
  2. A copy of the latest version of MaxMind’s GeoIP City database, which provides the mappings from IP to map coordinates in latitude and longitude.  You can download the latest free version here.
  3. The scripts require two PEAR modules:  Net_DNS and Net_GeoIP.  If you are running this on your own server, just use ‘pear install Net_DNS Net_GeoIP’.  If you are on Dreamhost, you can follow the awesome instructions on David Yin’s blog to get Pear installed first.

Once you have everything ready, all you need to do is download this PHP script, and customize it in a few places:

  1. If you are on Dreamhost, and you had to install Pear in your home directory, uncomment the Dreamhost section at the top of the file (and replace the path with the real path to the “php” subdirectory of your Pear installation.  If you followed David Yin’s instructions above, the path will be:
    /home/USERNAME/pear/php
  2. Replace the fake path on this line:
    $geoip = Net_GeoIP::getInstance("/FIX-THIS-PATH/GeoLiteCity.dat");
    with the real path to your GeoIP City database file.
  3. Replace the fake IP addresses on this line:
    $resolver->nameservers = array('YOUR.FIRST.DNS.HERE','YOUR.SECOND.DNS.HERE','YOUR.THIRD.DNS.HERE');
    with the real DNS servers that you want to use for looking up hostnames.
  4. Finally, copy the edited file into the documents folder of your web server (make sure that it has a .php extension) and point your browser at it!

You should now be able to enter an IP address or a hostname and have it pull up a Google Map of the correct coordinates!  If the hostname lookups don’t work off the bat, double-check step 2 above and try uncommenting the two DNS debugging lines in the PHP file.  Remember to give it DNS servers relative to your web server.

At this point, you might be wondering why I’m posting the PHP code instead of simply hosting this page myself. Turns out that Maxmind’s license for the free GeoIP database forbids you from providing a publicly-available interface that allows translating IP addresses into coordinates. The only way to do this (legally) using the free database is to either run this on an internal web server (not accessible to the public) or to password-protect the page using .htaccess files.

Obviously, this could be easily extended to add some stuff like plotting multiple different records from the DNS queries instead of just the first hit. Another idea is to make it spit out KML so that it would just magically work with Google Earth as well. I will leave that to you (or perhaps to some kindly strangers down in the comments).

Also, the hostname lookup feature reveals something interesting when you use it on edge-cached domains or clouds, but I’ll leave that for the home experimenter to explore.

… It lives, my creation LIVES

How To Connect a PS/2 Keyboard to the iPhone

Although I’ve seen many pictures of PS/2 keyboards plugged into iPhones on the Internet, no one has yet published a detailed howto on how to get this working yourself.  Until now, that is.

In this article I will show you how you can make a PS/2 keyboard to iPhone converter, including all hardware and software instructions. As the bugs get worked out, or improvements are made, I’ll update this page. Continue reading “How To Connect a PS/2 Keyboard to the iPhone”

Groo: Fully Automated WEP Cracking

Updates Below!

I don’t know about the rest of you, but I have an entire room of my house which is simply a huge pile of electronics scrap.  A hacked Tivo, some chipped XBoxes, an old VCR, a pile of PCI video cards, a full shoebox of 64MB Compact Flash cards…  You get the idea.

One day, I decided to put some of this junk to good use and I wandered into the scrap heap looking for inspiration.

Inspiration came in the form of an Atheros wireless card and an old ITX barebones system that had been picked up from a junk table at DefCon for $60 the year before.  The ITX box has a single PCI slot, perfect for a decent Atheros wireless card with an external SMC antenna connector.  It also runs on 12V DC power, so I can run it off the car battery.

Over the next few weeks, I built a small embedded Linux system for the sole purpose of cracking WEP keys.

First, I added a USB wireless network card to use as a control interface that I could access from my iPhone.

I also built a small web service that completely automates the process using the Python web framework TurboGears, aircrack-ng, and screen.

The web interface is incredibly simple – it uses only a single combo box.  This makes it ideal for using from the iPhone.

Now, instead of being the sketchy guy sitting in my car with a laptop, I’m just another Seattle-ite staring into my iPhone while the computer doing the WEP cracking is running off my car battery halfway down the block.

Everything in the web interface is fire-and-forget.  You can view a list of available networks, select one for cracking, and it will automatically:

  1. Reconfigure the wireless interface to the correct channel
  2. Begin dumping packets with airodump-ng in a screen session
  3. Begin an ARP replay attack with aireplay-ng in a screen session
  4. Automatically kick off the actual WEP cracking by starting aircrack-ng in a screen session
  5. Once the crack has succeeded, save the ESSID, BSSID, and cracked WEP key in a SQLite database

Since each of the aircrack-ng tools are running in a separate screen session, you can disconnect from the control interface as soon as the crack starts.  You can also reconnect at any time during the crack and view each screen session separately.

When close enough to a target for the ARP replay attack to work, this script averages only 3 minutes to crack a WEP key.  This is on an ITX box with a wimpy Cyrix C3 processor with only 256MB of RAM!

My scripts and installation instructions available here.

Update:

I have ported these scripts to the EEE pc (I use Ubuntu Netbook Remix on a 900A), available here.

However, I can’t get airodump-ng to actually capture any packets!  I believe this is a problem with my madwifi driver, but I haven’t sorted it out yet.  Hopefully, if I post the scripts one of you can help me out 🙂

Another Update (October 2010):

Hello Hackaday!  Since writing this initial version, I’ve since learned a lot about Python job control.  Check out the Jabbercracky project, also on this site.  I’m planning on a much-improved version of Groo, using what I’ve learned from Jabbercracky, which will also add some new tricks, including some available WPA cracks.  I’d also like to improve the installer, and to also provide builds for Ubiquiti networks hardware.  If anyone is interested in helping out, please email me at awgh at awgh dot org.

Stay tuned…

Replace Your Face Just Like The Laughing Man

Updates below!

I’d like to share two things with all of you.  The first is a dark, personal secret.  The second is a toy I made.

The secret is that for the past few months I have been harboring an unhealthy obsession with the Japanese television series ‘Ghost in the Shell: Standalone Complex.’

What I love about this show the most is one of the recurring bad guys, an impossibly-skilled hacker called the Laughing Man who exhibits a number of extremely bad-ass qualities.

First and foremost, he can hack in to people’s minds and control them.  In the show, he uses this to carry out a series of political assassinations.

During these attacks, he also simultaneously hacks in to all security cameras and news feeds in the surrounding area, and blocks out the face of the person he’s currently controlling with a custom graphic.

This graphic is a smiley face with a baseball cap and a quote from Catcher in the Rye: “I thought what I’d do was, I’d pretend I was one of those deaf-mutes…”

Watching this show the other day, I suddenly realized that I could write a program that did face detection and substitution quite easily.  Once I realized I could do it, I had to.

So I quickly whipped up a program in Processing that does the following:

1)  Opens up a video camera (for example, the web cam in your MacBook).

2) Finds all faces in the frame using the OpenCV library for Processing (installation instructions here).

3) Replaces all faces with the Laughing Man graphic, borrowed from elmex over at ta-sa.org.

Try it out yourself!  It’s minutes of fun for the whole family.  Also, it could be useful in case you ever find yourself in control of some kind of video feed.

The hack-in-to-your-mind thing will have to wait for the time being…

Once you’ve got Processing and OpenCV for Processing installed, download laugh-0.2.tgz.

Update: I’ve merged in changes from the comments!  Text now rotates and the image scales!  Thanks to Josh, Brett, and Deltadesu!